You don’t need to be any good at cake decorating to make these really impressive birthday number cakes. Even if you have never iced a cake before I’m going to show you have to make a birthday cake that will delight your kids and impress your party guests.
Keep on reading for step by step instructions.
Ingredients
- 4 Eggs 77p
- 1 Teaspoon Baking Powder 3p
- 225g Self Raising Flour 11p
- 225g Caster Sugar 34p
- 425g Butter (225g for cake 200g for frosting) £3.38
- Cocoa Powder 30p
- 400g Icing Sugar 71p
- 400g Coated Chocolates (3 Packs) £4.05
- 750g Chocolate Fingers (6 Packs) £5.94
Total = £15.63
Makes 30 servings = 52p per serving

Food purchased from Aldi. Prices correct at time of publishing.
Step 1 – Prepare Your Number Cake Tin
When my kids first started having birthday parties I treated them to one of these cake tin sets.
It’s a large rectangular cake tin with inserts that you add and rearrange according to the number you want. There’s easy to follow diagrams included in the instructions so you don’t have to figure out what to put where.
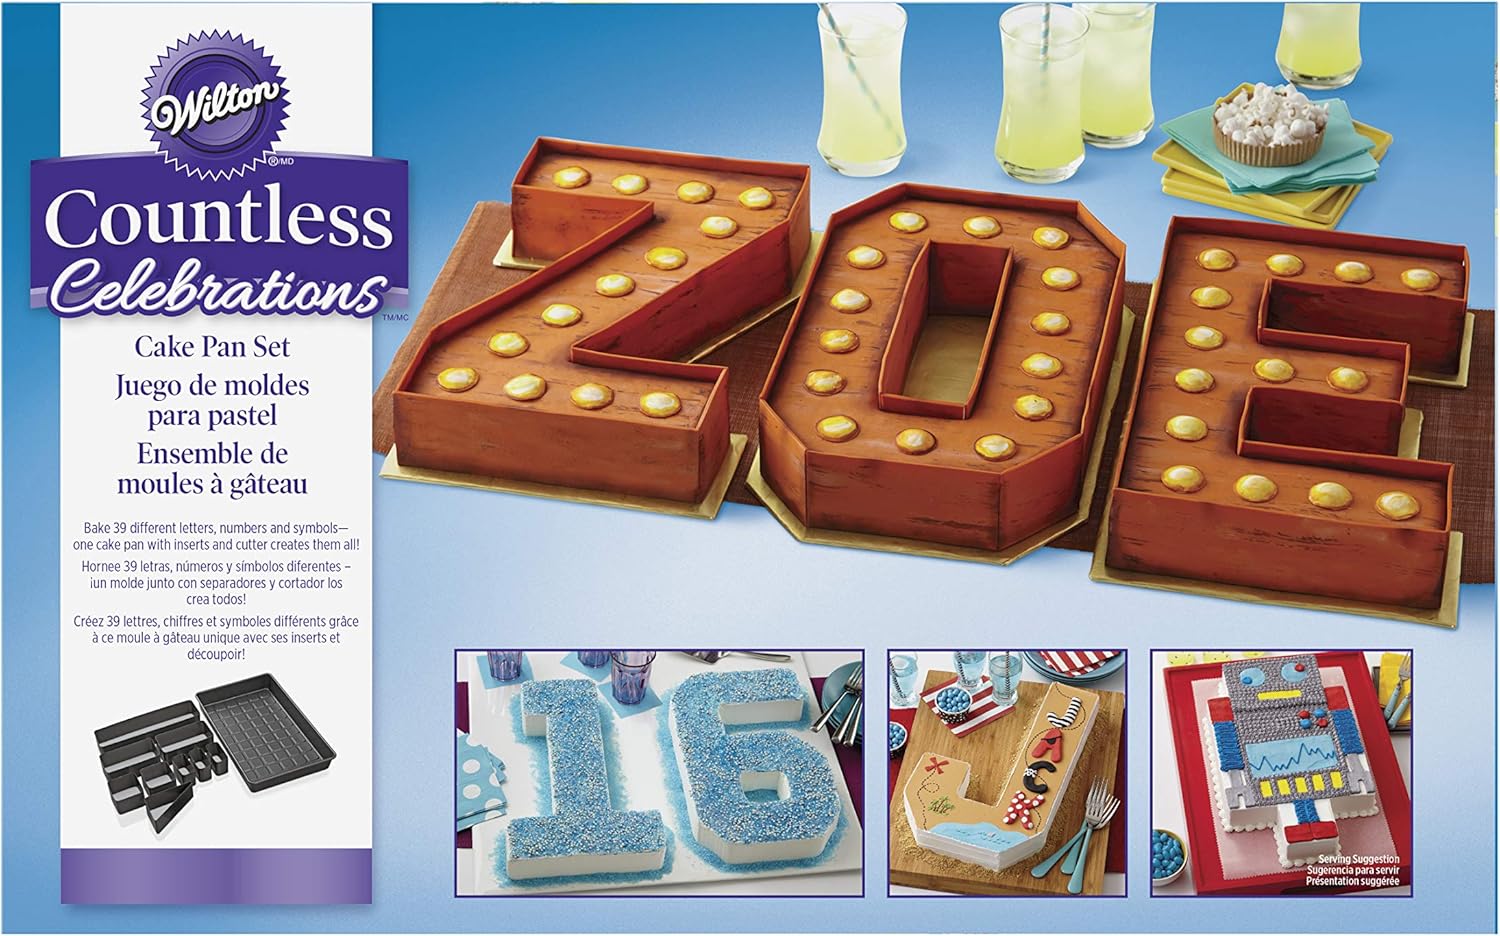
It just takes a minute or two to set up the pan. Then you need to grease it really well – I like to use margarine or spray oil if I have some handy.
Step 2 – Mix the Chocolate Number Cake
If you can get your butter down to room temperature before you start baking.
You can cut the cost of this chocolate cake recipe by using a mix of margarine and butter. The cake will taste just fine but using real butter will really elevate this cake mixture into something special. As I’m generally making these cakes for parties I usually push the boat out and indulge in the real butter.
Start by weighing out the butter, sugar, baking powder and flour into a mixing bowl.
- 1 Teaspoon Baking Powder
- 225g Self Raising Flour
- 225g Caster Sugar
- 225g Butter
Add 4 eggs and mix it really well. A stand mixer makes light work of this.

Sprinkle in some cocoa powder and mix it in.
I’ve never measured the cocoa powder. I usually just give the tub a shake and sprinkle some in, I’d say it’s a few tablespoons.
If you prefer vanilla cake then feel free to leave out the cocoa powder and add vanilla flavouring instead.
Arrange the cake tin and grease it really well with butter, margarine or spray oil. Make sure you get all the sides really well greased. Do not scrimp on the grease!! Seriously make sure that your cake tin is really well greased.
Pour the mixture into the cake tin.

Step 3 – Bake Your Chocolate Number Cake
Pop the your cake into your oven set at gas mark 4. That’s 180°C or 350°F.
You need to cook the cake until you can insert a skewer (or a fork) into the centre of the cake and bring it out looking clean. I usually set an alarm to check the cake after 30 minutes.
Once the cake is cooked leave it to cool completely before decorating.
Step 4 – Make the Buttercream Frosting
For the frosting mix the remaining 200g of butter with 400g of icing sugar, along with a sprinkling of cocoa powder.
A stand mixer makes this quick and easy.
Spread the frosting onto the cake with a spatula. Try to coat the cake evenly but the beauty of this method is that you don’t have to get it neat because it will be completely covered up later.
Step 5 – Decorate Your Chocolate Number Cake
The great thing about these number (or letter) cakes is that you don’t need to be any good at cake decorating to create a really impressive cake. I usually just slap some buttercream frosting on and call it good. One year I covered the top in sprinkles which looked great. Another year I used green frosting and added some cheap dinosaur toys, it looked amazing!
This year my Little Dude asked for a rainbow cake with smarties.
Before the frosting set I gently pushed about a million smarties into the top surface of the cake. So Many smarties!!!
Then I stuck chocolate fingers around the edges of the entire cake. Oh wow, this took so many chocolate fingers!
Because all the surfaces of the cake are covered with sweets and chocolates you really can’t see how terrible I am at icing!!
Once you’ve finished decorating the cake pop it in the fridge for a few hours to set the frosting.
Step 6 – Serve and Enjoy
Because they’re mostly made up of rectangles these cakes are crazy easy to cut and serve at parties. I get the kids to form an orderly line (Yeah right – I get another adult to conduct crowd control) and then I cut the cake into equally sized pieces and hand them over to the kidos served on a napkin.
I do hope that my Chocolate Cake recipe has inspired you to have a go at making your own easy kids birthday cakes.
Follow me on your favourite social media channel for more budget family recipes.

Pin It Now, Cook it Later
Pin this Chocolate Cake recipe to your Pinterest board so you can find it when you need a fun and easy birthday cake recipe.

A Note on Food Safety
Freezing and defrosting food really isn’t complicated. But it terrifies me how many people aren’t familiar with basic food hygiene so if you’re new to cooking from scratch and freezing please follow these safety guidlines.
The important things to remember are:
- Wash your hands and anything else that has been in contact with raw meat.
- Meals should last for about 3 days in the fridge.
- Do not defrost your meals at room temperature.
- Do not refreeze meals you have already defrosted.
- Consume food before the use by date.

A Little Bit About Me . . .
Hey there I’m Bridie, a busy mum to two amazing humans, a spirited border collie puppy and a pair of sweet guinea pigs. We homestead in a cherished Edwardian terrace in not so sunny Lancashire, England.
When I’m not spending time with my children and menagerie, I’m usually to be found in my craft room creating and blogging or in the kitchen cooking up a big batch of something tasty. I’m always looking for thrifty hacks to save money on my crafts and recipes. Crafting doesn’t have to cost a fortune!
I have been batch cooking for about 30 years (yikes that makes me feel old!) I’m sharing all my batch cook recipes, in depth batch cooking tutorials and all my tips and tricks to help you slash your food bills.
Each week I cook up a big batch of a single meal. Most of it goes in the freezer, then it’s just defrost and reheat or sling it in the oven. Even on busy school nights my family get to enjoy healthy home cooked meals that my kids actually eat.
Each week I share a new recipe on my blog. Most of my meals cost less than £1 per portion.
I really hope that my ideas can help you to stretch your budget.

I’ve included links to my favourite retailers for the products I’ve used to make my crafts. Click on any of the product images and links for full details. If you decide to buy any of these products I may get a small percentage of what you spend. There’s no cost to you at all.
Aran Knitting Baby Baby Scrapbooking Batch Cooking Beginner Scrapbooking Beginner Sewing Pattern Birthday Cards Budget Recipes Cards for Children Cards for Girls Chicken Recipes Christmas Christmas Cards Craft Sensations Dovecraft Easy Sewing Pattern Elasticated Channel First Edition Free Knitting Pattern Free Sewing Pattern Healthy Eating Healthy Recipe My Minds Eye Papermania Peek-a-Boo Patterns Polkadoodles ProMarkers Scrapbooking Sewing Sewing for Kids Sewing Pants Sewing Tops Sewing with Jersey Sewing with Wovens Simply Creative Sizzix Slow Cooker Recipes Soup Recipes Spellbinders Stitch Upon a Time Tim Holtz Top Stitching Vegetable Gardening Winsor Newton XCut







Leave a Reply